Posted in Cakes and CupCakes, Cooking, Dessert

Toffee Apple Cupcakes

The story behind these cupcakes is a little bit of a laugh. I was preparing for a work outing, I was wandering around my office, getting all of my things together, preparing myself, pretty much making sure that I had everything all sorted. As I was about to walk out the door, I realized that I couldn’t find my lunch! I searched everywhere; in each of my drawers, on every surface, on every shelf… I even got down on the floor and searched under all the tables. No matter where I looked, I couldn’t find it anywhere. WHERE COULD IT HAVE GONE!

As I was running late and needed to leave, I was about to walk out the door without any food *sad face*. Fortunately, two of my lovely fellow employees came to the rescue. They ran to their own lunchboxes, and filled a bag with snacks and fruit for me to take. So sweet of them!

Anyway, I went off to my work outing, and I wasn’t hungry. I then came back to find my lunch… it was on my chair while it was pushed in under my desk… how embarrassing. So I made these delicious cupcakes as a thank you to my lovely co-workers.

Serves: 12ish (as we all know, this isn’t accurate… it wholly depends on how much batter you eat)

Time: 30 minutes (plus cooling time)

What you need:

Cupcake

  • 2 sweet apples, 1 grated, 1 thinly sliced
  • 1 tablespoon lemon juice
  • 2 1/4 cups plain flour
  • 2 teaspoons baking powder
  • 1 1/2 teaspoons ground cinnamon
  • 1/4 heaped cup, light brown sugar
  • 4 tablespoons butter
  • 1/2 scant cup milk (take a sip out of it to make it scant… that’s what I did!)
  • 1/2 scant cup apple juice (use the same technique as you did for the milk to make it scant.)
  • 1 egg, beaten

Topping

  • 2 tablespoons light cream
  • 3 tablespoons light brown sugar
  • 1 tablespoon butter

What you do:

  • Toss the apple slices in the lemon juice.
  • In a separate bowl, sift together the flour, baking powder, and cinnamon.
  • Stir in the sugar and grated apple.
  • Melt together the butter and the milk. (Note, do this together. If you melt the butter and add it to the milk, the milk will make the butter… coagulate??? Get lumpy and ikky and stuff).
  • Combine the apple and the egg.
  • Combine the dry ingredients and the wet ingredients.
  • Mix lightly until just combines.
  • Heat the oven to 200 degrees Celsius.
  • Prepare 12 cupcake pans in a cupcake tin.
  • Spoon the mixture into the prepared cupcake pans.
  • Place two apple slice on top of each cake.
  • Bake for 20 – 25 minutes on a low level of the oven.
  • Cupcakes are done when a skewer comes out clean when inserted.
  • Allow the cupcakes to cool.
  • Meanwhile, place all the topping ingredients into a small pan.
  • Heat, stirring continuously, until the sugar has dissolved.
  • Increase the heat and allow to boil rapidly for two minutes or until thick and syrupy.
  • Allow to cool slightly, then drizzle over the cakes and allow to set.

IMG_9648

Posted in Cakes and CupCakes, Dessert

Vanilla and Fig Cupcakes with Honey and Cinnamon Buttercream

I must say, this is probably the most ‘foofy’ sounding recipe that I have made. But there really isn’t anything else that I can call it, without it being deceiving or inaccurate. But pretty much this all started when one of the lovely ladies I work with bought figs with her to work! She has a fig tree, and too many figs for her to deal with. So she bought them to work to offload them. Then came the question, what can you do with figs apart from eat them fresh or make jam. (Side note. The word fig jam makes me laugh, because it reminds me of when I was a kid in school, and FIGJAM stood for F*!& I’m Good Just Ask Me). So I set out to find something else that is super yummy and made with figs. Here it is!

Serves: 12ish (I always find recipes yield less than they suggest… or maybe I just eat a lot of the batter before I cook)

Time: 30 minutes, plus cooling time.

What you need:

Cupcake

  • 1 1/2 cup plain flour
  • 1/4 teaspoon salt
  • 1 1/4 teaspoon baking powder
  • 1 cup sugar
  • 1/2 cup butter, room temperature
  • 1 egg
  • 2 egg whites
  • 1/2 cup milk
  • 1 teaspoon vanilla extract

Fig Filling

  • 1 cup fresh figs, chopped into small even pieces (skin on, or skin off. Entirely up to you. I left the skin on)
  • 1/4 cup water
  • 1/4 cup brown sugar
  • 2 teaspoons lemon juice

Buttercream Icing

  • 1/2 cup butter, room temperature
  • 3 cups icing sugar (may need more or less, depending on the day, buttercream can be very temperamental)
  • 2 tablespoons clover honey
  • 1/4 teaspoon cinnamon
  • 2 – 3 tablespoons milk (may need more or less, for the same reason as the icing sugar)

What you do:

Cupcake

  • Beat together the butter and sugar until light and fluffy.
  • Add the egg and beat until combined.
  • Add the egg whites one at a time, and beat until combined.
  • Meanwhile, sift together the remaining dry cupcake ingredients.
  • In a separate bowl, combine the milk and vanilla.
  • Add the milk and sifted dry ingredients to the butter and sugar in alternating additions. Ensure you both start, and end with the dry ingredients.
  • Beat JUST to combine, be wary not to over beat.
  • Preheat the oven to 150 degrees Celsius.
  • Prepare cupcake pans in a cupcake tin.
  • Divide the batter into the cupcake pans.
  • Bake for 20 – 25 minutes, until a skewer inserted into the middle comes out clean.
  • Allow to cool on a wire rack.

Fig Filling

  • While the cupcakes are baking, combine all the fig filling ingredients in a saucepan over medium heat.
  • Stir occasionally for 15 – 20 minutes, or until the sauce thickens.
  • Mash the figs up as best you can with a spoon.
  • If you would like a smoother consistency, whizz (yes, a technical term) them quickly with a Barmix or food processor.
  • Set aside and allow to cool.

Buttercream

  • This can be made during the cooling time, as it can happily sit and wait for everything to cool.
  • Cream the butter in a mixer until fluffy.
  • Slowly add 1 cup of icing sugar and beat until smooth.
  • Add the honey and cinnamon, mix until combined.
  • Alternately add icing sugar and milk, until the desired quantity if received.
  • The consistency should be similar to stiff peaked egg whites. So it should be able to stand alone easily and be light and fluffy.

Final steps!! Assembly

  • To assemble the cupcakes, use a small sharp knife, and cut a plug out of the top of the cupcakes. (Set these aside, you will need these as taste testers… yes you will need all 12 to taste test, you know… just to make sure).
  • Spoon the fig filling into the holes in the cupcakes.
  • If you want, you can pop some cupcake back on top to plug the whole up… but I didn’t do this. Rather, simply ice over the top!
  • Use a piping bag to pipe the icing on top of each cupcake. (Note… I used old honey that had started to go crystalline, therefore it didn’t push through my icing bag well, so I had to use a different larger icing tip. As a result, it looks a little like I have little poos on top of each cupcake. Very, very tasty little poos!)
  • Sprinkle each cupcake with a little more cinnamon and serve.

IMG_9647

Posted in Chocolate, Cookies and Biscuits, Cooking, Dessert, Party Food, Slices and Bars

Nutella Brioche

Oh my goodness! So the first thing that I need to do is apologise for the last two weeks; I just went AWOL. No warning, POOF! I was gone, and I am terribly sorry about that. I had a bunch of recipes backed up and ready to go, but for some reason they just… disappeared! Then on top of that, I have recently began working at my new job, which has simply DEVOURED all my available time, so I wasn’t able to sit down and rectify my unexpected and purely accidental hiatus.

But I am back now, and I am back with a BANG! I am sure you have all seen this video somewhere on cyber space lately. Well i had someone test me… challenge me if you will… to attempt to make this. You all know me well enough by now, to know that I don’t back down from a cooking challenge. So I accepted, and the results were purely fantastic!

Serves: 8 really hungry people, or 16 kinda hungry people

Time: 40 minutes (plus 1 – 2 hours of proving time)

What you need:

  • 500g plain flour
  • 190mL tepid milk
  • 3tbs castor sugar
  • 60g melted butter
  • 2 eggs
  • 1tsp salt
  • 1tsp dried yeast
  • Nutella
  • 1tsp milk and 1tsp water for glaze
  • icing sugar for dusting

What you do:

  • Carefully mix the yeast and sugar into the tepid milk. (Note, if the milk is too cold, the yeast will not activate, if it is too hot it will kill the yeast.) Allow to sit, undisturbed, for 10 minutes for the yeast to activate.
  • Meanwhile, break the eggs into a bowl and beat lightly.
  • Sift the flour and salt together in a large bowl.
  • Make a well in the centre and add the butter, eggs, and milk. Mix to s soft dough.
  • Knead the dough for 10 minutes, or until smooth.
  • Form the dough into a ball and place in a lightly greased bowl. Cover with a damp towel, and store in a warm place with no draft until the dough has doubled in size.
  • Meanwhile, find a dinner plate that fits snug inside your baking tray, you will use this plate as a template.
  • Use the plate to cut out a circle of grease proof paper and place on your baking tray.
  • Once the dough has double in size (45 minutes to an hour), turn the dough out onto a floured surface. Knock back and knead for 3 – 4 minutes. Divide into four even pieces, and form each piece into a ball.
  • Roll one ball into a circle measuring the diameter of your dinner plate, and measuring approximately 3 – 4mm thick.
  • Place onto the prepared grease proof paper and top with a healthy layer of Nutella. Allow an area of 1cm from the edge of the dough remain Nutella free.
  • Roll out the second ball of dough, and place on top of the first circle of dough and top with Nutella.
  • Repeat with the third and fourth ball.
  • Combine the off cuts, and create a final circle of dough and place on top. Do not cover this layer of dough with Nutella.
  • Use a small drinking class, place in the centre of the dough circle.
  • Using a sharp knife, cut the brioche into 16 even segments. Use the cup as a guide to ensure you leave a section in the middle uncut.
  • Take a pair of adjacent segments. Lift and twist them away from each other 360 degrees. Press the ends of the segments together.
  • Repeat this process for all remaining pairs of segments. (Here, the video may be really helpful to visualise what needs to be done).
  • Cover the brioche lightly, with a lightly greased sheet of plastic wrap. Leave for 1 – 2 hours to prove.
  • Heat the oven to 180 degrees Celsius.
  • Brush the brioche with glaze, and place in the oven to bake for 20-25 minutes.
  • Remove from the oven, and allow to cool slightly.
  • Dust with icing sugar and serve.

IMG_9439

Posted in Breakfast, Cooking

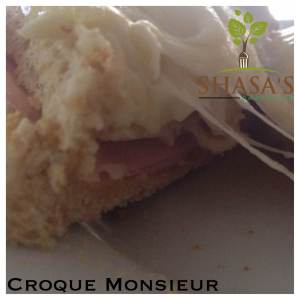
Croque Monsieur (French ham and cheese toastie)

I am going to be honest, the first time that I saw these I laughed. I saw it sitting in a display case at a café and thought “That’s right, give a ham and cheese toasted sandwich a fancy name, you’ll sell more.” I scoffed at the idea. I have since gone to a French Café and tried legitimate Croque Monsieur as Le Fiancé suggested it. It was FANTASTIC! I cannot believe I hadn’t tried this earlier. So naturally, I had to try to make it myself.

This recipe calls for a fancy cheese, Gruyere. It is available at most local supermarkets, you may just need to ask for it. If possible please use the correct cheese. Yes you could use a Swiss cheese or Jarlesburg, but it simply isn’t as fantastic.

Serves: makes 4

Time: 20 minutes

What you need:

  • 1 tablespoon unsalted butter
  • 1 ½ tablespoons all purpose flour
  • 1 cup hot milk
  • ½ teaspoon salt
  • ¼ teaspoon ground pepper
  • Pinch nutmeg
  • 2 ½ cups grated Gruyere cheese
  • ¼ cup grated Parmesan cheese
  • 8 slices sandwich bread (white is recommended, but any will taste good), crusts removed
  • Dijon mustard
  • 8 slices champagne or honey leg ham

What you do:

  • Preheat the oven to 190 degrees Celsius.
  • Place the bread on a baking sheet, and place in the oven for five minutes.
  • Turn each slice over once, and bake for a further two minutes. Remove from the oven.
  • Meanwhile, melt butter in a saucepan over low heat.
  • Add flour, stir with a wooden spoon for 2 minutes.
  • Slowly pour in the hot milk, whisking continuously until the sauce thickens and is smooth.
  • Remove from the heat and add salt, pepper, nutmeg, ½ a cup of Gruyere cheese, and all the Parmesan. Combine thoroughly and set aside.
  • Spread Dijon mustard on one side of half the slices of bread, making this the bottom of your sandwich.
  • Top each slice with ham.
  • Sprinkle half the remaining Gruyere cheese on top of the ham.
  • Top with the other slice of bread.
  • Slather the tops of each sandwich with the cheese sauce.
  • Sprinkle the remaining Gruyere on top.
  • Bake each sandwich in the oven for 5 minutes.
  • Place under the grill for 3 to 5 minutes, or until the top is golden.
  • Serve while hot.
It is sort of hard to made this look attractive. This meal is more of a hot mess.
Posted in Cake Decorating, Cakes and CupCakes, Chocolate, Cooking, Dessert

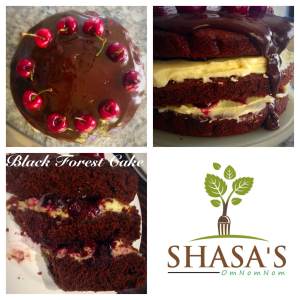
Black Forest Chocolate Cake

When I was younger, I was that kid that never wore shoes and was always covered in dirt and bruises. To be 100% honest, not all that much has changed. If I don’t have to wear shoes because social conventions tell me I should, I will not have shoes on. I am regularly covered in bruises, and getting outside and digging in the dirt is still fun, so is climbing trees. When I was about 9 years old, I was playing with my cousins at their house. Their house was a mecca for climbable trees, and therefore our dream. We climbed all the trees, many times, until *THUD* I fell. While sitting on a branch approximately two meters in the air, above a brick pathway, I leaned backwards, laughing in my hysterically loud laugh, to something that only 9 year olds would find funny, and I lost my balance. I fell and landed directly onto the bricks and knocked myself out. To this day, my last memory stops about an hour before the fall, and picks back up when I come to in the backseat of my parent’s car.

Black Forest Cake… This is one of those decadent cakes that you see in the window and it looks so graceful and elegant. There seems to be an air of luxury, with an adult flair. I love dark chocolate, it seems to mature and sophisticated. The restaurant we went to made many comments on my cake as they were very impressed, my favorite one being “Oh wow… That certainly is no generic Cheesecake Shop cake, it’s amazing!” To be honest, I think this would be an amazing Christmas cake!

Serves: 10 hearty servings, 12 if you pushed it.

Time: 40 minutes (plus 1 hour cooling time)

What you need:

  • 175g butter
  • 200g dark cooking chocolate
  • 300g plain flour
  • 375g caster sugar
  • 25g cocoa
  • Pinch of salt
  • 1 teaspoon bicarbonate of soda
  • 2 eggs
  • 200mL natural yoghurt
  • 425g tin pitted cherries (reserve 2 tablespoons of the juice, drain the remaining)
  • 100g cherry jam
  • 4 tablespoons Chambord (or any other cherry liqueur). (Save an additional 4 tablespoons of cherry juice if you don’t want to use an alcohol).
  • 500mL double cream
  • 3 tablespoons icing sugar
  • 10 – 12 cherries

What you do:

  • Cut the butter into pieces, and cut 75g of the dark chocolate into pieces. Carefully melt the two together in a bowl and combine well. (Either melt over a pot of boiling water, making sure the water doesn’t touch the bottom of the bowl, or melt it VERY carefully in the microwave)
  • Sift together the flour, sugar, cocoa, bicarbonate of soda, and salt.
  • In a separate bowl, whisk together the eggs and yoghurt.
  • Add the wet chocolate mix to the egg mix and combine well.
  • Create a well in the middle of the dry ingredients and add the wet chocolate and egg mixture. Add 100mL of boiling water and combine well until the mixture is free of lumps. (This can be done with a hand whisk, a little tiring though).
  • Heat the oven to 180 degrees Celsius. (The reason I am not saying this at the start any more is actually a little money saving tip. As a general rule, ovens only take about three minutes to get to the correct heat. So to have an oven running on heat for a lengthy period of time while you prepare, is very wasteful. By turning it on now, we are not being wasteful, and the oven should be ready when you are ready to use it.)
  • Prepare three, 20cm cake tins.
  • Evenly divide the mixture between the three cake tins, bake for 25 minutes. (If the cakes are on different levels in your oven, shuffle them around with 5 minutes of cooking time remaining).
  • Cakes are cooked when a skewer prick in the middle comes out clean.
  • Meanwhile, prepare the remaining ingredients:
    • In a small bowl, combine the Chambord and the reserved cherry juice.
    • In a separate bowl, carefully heat 200mL of double cream.
    • Add the remaining dark chocolate, and stir until melted, combined, and smooth. Creating a chocolate glaze. Set aside.
    • In a separate bowl, combine the tinned cherries and cherry jam. Mush the cherries so they are not so big.
    • In another bowl, sift the icing sugar. Whisk together with the remaining cream until softly whipped.
  • Once the cakes are cooked, keep them in the tins. Prick the tops a number of times with a skewer.
  • Evenly pour the Chambord mixture over each cake, there should be two tablespoons of mixture for each cake.
  • Allow the cakes to cool before removing from the tin.
  • Once cooled, spread half the cream mixture over the base piece of cake.
  • Top the cream with half the cherry mixture.
  • Place the middle section of cake on top, and top with the remaining cream and cherries.
  • Place the top piece of cake on top, and drizzle with the chocolate glaze mixture.
  • Decorate with the cherries on top! I used 10 cherries, this made it easy to divide the cake into 10 even slices for my guests.

After Le Fiancé tried it, this is what he had to say (I have edited out some of our silly banter):

“I’m having your cake now. Ohhhhh sooo yum! And I’m not normally a fan of cherries in cakes, but this was good.”

If this cake can make someone, who doesn’t even LIKE fruit in cakes, LOVE this Black Forest Cake… then it is a winner in my books!

IMG_8859

Posted in Cooking, Pasta

Wet, American, Macaroni & Cheese

Recently I told you about my grandma, and the misfortune of her dog dying while she was in another state. Well, as any normal owner would, she buried her dear dog in her backyard, gave him a memorial and a little headstone. A beautiful way to commemorate the passing of your pet. It was around this time that we began to notice that my grandma was experiencing, lapses, in her memory. Maybe a month after the burial of her dog, she had lost of car keys, and upon speaking to her son, he said as a joke, “Maybe you buried it with the dog.” As the burial had happened a month prior, and she had used her car keys since then, it was not a possibility. However, my grandma traipsed into her backyard, shovel at the ready, and dug up her poor dead dogs body looking for her car keys! Needless to say, they weren’t there, and the poor pooch had to be reburied. She later found the keys, where she had left them, and always leaves them… in her handbag.

I have had trouble finding a good macaroni and cheese recipe; all the ones I find tend to be dry ones. Yes okay they’re healthier, but where is the fun in that?

Serves: 6

Time: 1 hour

What you need:

  • 2 tablespoons butter
  • 1 small onion, finely chopped
  • 150g bacon, finely chopped
  • 2 tablespoons plain flour
  • 2 cups full cream milk
  • Salt and Pepper to taste
  • 1 teaspoon Dijon mustard
  • 240g macaroni pasta
  • 2 cups sharp tasty cheese, grated
  • 240g cheddar cheese, grated

What you do:

  • Begin cooking your pasta until aldente. (Place pasta in a bowl that is too big, the pasta needs room to move around. Add tepid water until it is above the level of the pasta. Put over a high heat. Once the water begins to boil, add salt and time ten minutes)
  • Meanwhile, melt butter in saucepan over medium heat; add onion and bacon and sauté for two minutes.
  • Sift in flour, stir through well. Allow to cook for a further minute.
  • Add milk, salt, pepper, and mustard. Stir constantly until mixture begins to bubble and thicken.
  • Preheat the oven to 180 degrees Celsius.
  • Add the cheeses, and stir through thoroughly.
  • Prepare a 1 Litre baking tray.
  • Drain the pasta once cooked, then place in the baking tray.
  • Top with cheese mixture, and combine well.
  • Place in the top level of the oven for twenty minutes. It should come out bubbling and smelling fantastic.
  • Remove from the oven, and allow to cool for ten minutes before serving.

IMG_8858

Posted in Cooking

Blueberry and White Chocolate Muffins

We haven’t had a story about my blissfully insane grandmother. This story is not so much about her, as about an incident vaguely involving her. She originally hales from a state that is a four hour flight, or a three day drive from where we live. On a visit over to us, she was worried about the welfare of her pet sausage dog while we were gone because the dog was getting old. One of her friends was commissioned to look after the sausage dog while my grandma was gone. Unfortunately, the worst happened. Dear sausage dog passed away while my grandma was here. However, the friend looking after the dog didn’t know what to do, and was too afraid to inform my grandma as she thought she would be blamed. So she put the little dogs body in the deep freeze, with the intention of ‘thawing’ the dog so he would appear ‘freshly passed away’ upon my grandmas return back home. Needless to say my grandmother was much more lucid at this point in her life, and returned to find her poor sausage dog in the freezer. She took this surprisingly well, stating that at least she got to see her favourite pooch one more time before giving it the burial she wanted.

There will be no need to freeze these cupcakes, they will all get eaten before you get the chance.

Serves: 12 medium cupcakes

Time: 30 minutes

What you need:

  • 6 tbsp sunflower oil
  • 280g plain flour
  • 1 tbsp baking powder
  • Pinch of salt
  • 115g soft light brown sugar
  • 150g blueberries
  • 200g white chocolate chips
  • 2 eggs
  • 250ml milk
  • 1 tsp vanilla extract

What you do:

  • Preheat the oven to 200 degrees Celsius.
  • Line a 12 hole muffin tin with paper cases.
  • Sift the flour, baking powder, and salt in a large bowl.
  • Stir in the blueberries, white chocolate chips, and sugar.
  • Place the eggs in a large bowl and beat lightly.
  • Beat in the milk, oil, and vanilla extract.
  • Make a well in the centre of the dry ingredients, and pour in the liquid mixture.
  • Stir until just combined, be wary not to over mix as this will result in a heavier mixture.
  • Spoon the mixture into prepared paper cases.
  • Bake in the preheated oven for 20 minutes, or until well risen and golden brown and firm to touch.
  • Leave to cool in the tin for five minutes.
  • Serve warm or transfer to a wire rack to cool completely.

IMG_8807

Posted in Cakes and CupCakes, Cooking, Dessert

Gooey Chocolate and Cream Cheese Cupcakes.

My brother was not the only person in my family who was hoping I would have been born a boy. My father would have liked a boy too. He wanted to build and develop another sportsman! At a young age I was encouraged to play AFL (currently male dominated), and cricket. My father wanted me to succeed so much, he encouraged I first learn to play as a left hander. There were intentions of my becoming a captain of the female professional cricket team. Though I did not achieve these things, I am a skilled basketballer, and yes, I am a stronger left handed player, despite being right hand dominant.

Serves: 12 medium sized cupcake

Time: 45 minutes

What you need:

  • 175g plain flour
  • 20g cocoa powder
  • ¾ tsp bicarbonate of soda
  • 200g castor sugar
  • 50ml sunflower oil
  • 175ml water
  • 2 tsp vanilla extract
  • 150g soft, full fat, cream cheese
  • 1 egg, lightly beaten
  • 100g plain chocolate chips

What you do:

  • Preheat the oven to 180 degrees Celsius.
  • Line a 12 hole muffin tin with paper cases. (I use those reusable silicon cupcake moulds. However, they are hard to take to events because you lose themL. I also always prepare to make 14 cupcakes, that way I can eat one, and I can keep one aside for Le Fiancé!)
  • Sift together the flour, cocoa powder, and bicarbonate of soda. For best results, sift together two or three times to ensure the powders are well combined.
  • Stir 150g of the sugar into the flour.
  • Add the oil, water, vinegar, and vanilla extract and stir well together until combined.
  • Place remaining sugar, cream cheese, and egg in a large bowl and beat together until well mixed.
  • Stir in the chocolate chips.
  • Spoon the chocolate mixture into the paper cases.
  • Top each with a spoonful of cream cheese mixture.
  • Bake in the preheated oven for 25 minutes, or until firm to touch.
  • Leave cupcakes to cool in the tin for 10 minutes.
  • Transfer to a wire rack to cool completely.

IMG_8805

Posted in Cooking, Lunch, Party Food

Spinach and Ricotta Rolls.

I have words that I have learned (incorrectly) as a child, but continue to use them today. Mostly because they make me laugh, but more likely because our family actually changed, and began using the incorrect word rather than the correct one for entertainment purposes. This was my undoing recently when I approached my boss and said “There is a hellophone call for you.” Now I will explain the “hellophone”. We all know that it is a telephone, but everyone calls it a phone. I knew that, I also knew that the first thing that people said when they picked it up was ALWAYS “hello”. Therefore, I logically concluded that the correct name, for this devise was a “hellophone”. In my late twenties I still call it this, and refuse to be told otherwise or corrected.

I find that Spinach and Ricotta Rolls are one of those party foods that get ignored initially, until someone has one, exclaims how fantastic they are, then everyone dives in for one. So make sure you make a lot of these!

Time: 30 minutes

Yields: 12 sausage rolls (or about 50 bite sized pieces)

What you need:

– 6 sheets puff pastry

– 500g fresh ricotta (from the deli, packet stuff is too wet. If you do use packet, you will need to wring the liquid out)

– 500g frozen spinach, thawed and drained of liquid

– 2tsp nutmeg

– salt and pepper to taste

– egg wash (1 egg, 1tbs milk whisked together)

What you do:

– Combine all the ingredients (except the puff pastry) in a bowl and mix well.

– Lay out a sheet of puff pastry and cut in half, into two rectangles. You will now have 12 rectangles.

– Spoon the mixture down the length of one side of the pastry. The mixture should cover the middle third of the pastry.

– Brush some egg wash down one side of the filling, and rolls the other side over the top of the filling, attaching it to the other side. Creating a roll!

– Cut into the sizes you want. Bite sized, lunch box size, etc.

– Liberally egg wash each roll, sprinkle with sesame seeds if you want for decoration.

– Place in a 180 degree celsius oven for 20 minutes, or until flaky and golden.

IMG_8659

Posted in Beef, Cooking, Party Food

Homemade Beef Pies

I recently told you a story about all the animals that I have been bitten by… well this seems to be a trait that runs in the family. While my brother may not display a large variety in the animals that he has been bitten by, he surely takes the cake when it comes to being bitten in style!

When he was younger, he was at a family friends house. This family friend had an aviary with a number of cockatoos. My brother was instructed clearly to not put his fingers in the cage in case they get bitten. Well he most definitely didn’t do that, but my parents did hear a blood curdling scream! (Get your minds out of the gutter). When may parents went outside, he hadn’t stuck his fingers in the cage, but he had stuck his tongue in the cage, and the curious cockatoo had latched on!

The worst that these delicious pies will do to your tongue is burn it because you get excited and eat them too early! The fantastic thing about these, is that you can use them to use up your left overs. I will show you what left overs I used, and feel free to substitute your own in depending on what is in the fridge or freezer.

What you need:

– 1tbs olive oil

– 1 small brown onion, finely diced

– 2tsp mincd garlic

– 500g beef mince (use the fatty stuff! It’s much nicer)

– 3 rashers bacon, finely diced (these had been sitting in the freezer for a while)

– 1 cup mushrooms (again, a fridge left over. Probably left over from breakfast)

– 2tbs gravy (this was one of our left overs in the fridge, a ready made packet mix)

– 2tbs barbecue sauce

– 2tbs tomato paste

– 2tbs left over herbs (I had rosemary and thyme sitting in the fridge, so I used those)

– 1 carrot, finely grated (Fantastic thing here, is that you can use most any left over vegetables. Potato would be fantastic. Just remember that ideally you want your mixture to be a little wet)

– Poppy seeds

– 2 sheets puff pastry

– Cupcake baking tray

– 1 egg

– 1tbs milk

What you do:

– Heat a fry pan over medium heat. Heat the oil and fry the onion, garlic, bacon, and mushrooms until soft.

– Add the beef mince, and fry until cooked through.

– Add the remaining ingredients, stir through well and heat through. Set aside to cool.

– Remove the pastry sheets from the freezer just before you intend on using them.

– Find biscuit cutters (or you can use the lip of a cup) that are the same size as the cupcake pan hole, and another that is slightly larger than the cupcake pie hole.

– Preheat the oven to 180 degrees Celsius. Heat a flat biscuit tray in the oven.

– While the pastry is still mostly frozen, cut out enough circles to cover the hole in the cupcake tray.

– Place the slightly larger circle, centered over the cupcake hole. Allow to thaw slightly, and begin dropping in the middle. Don’t force it into the cupcake hole.

– Place the pie filling onto the pastry. Use the weight of the pie filling to push the pastry into the cupcake hole. This part may require a little coaxing, but if you are careful, the pastry will not break. Be careful not to overfill.

– Place the smaller circle over the top of the filling, and pinch the sides together with the pie base.

– Whisk together the egg and milk to make an egg wash.

– Liberally brush the egg wash over the top of the pies.

– Sprinkle some poppy seeds on top of the pies.

– Place in the over, on top of the hot biscuit tray, for 20 – 30 minutes (depending on size of pies), until golden. (Note: the purpose of the hot biscuit tray is to provide an immediately heat to the base of the pies, which will be the most moist part. This stops the bottom from falling out, and allows for even cooking.)

IMG_8616